
Waterproofing is one of the most important—and most frequently misunderstood—parts of a detachable container house.
Almost every supplier claims that its container houses will not leak. However, buyers still receive buildings with water entering through the roof, upper corners, wall joints, doors or windows.
The usual explanation is “the sealant failed.” In reality, sealant failure is often only the final symptom. The original cause may be an incorrectly formed roof seam, an uneven structural connection, a blocked drainage outlet, poor component fit or an installation error.
Reliable waterproofing therefore depends on the complete roof system, from fabrication and welding to drainage and final assembly.
Table of Contents
Understand the Roof Structure First
The roof of a detachable container house is not simply a steel sheet placed over four walls.
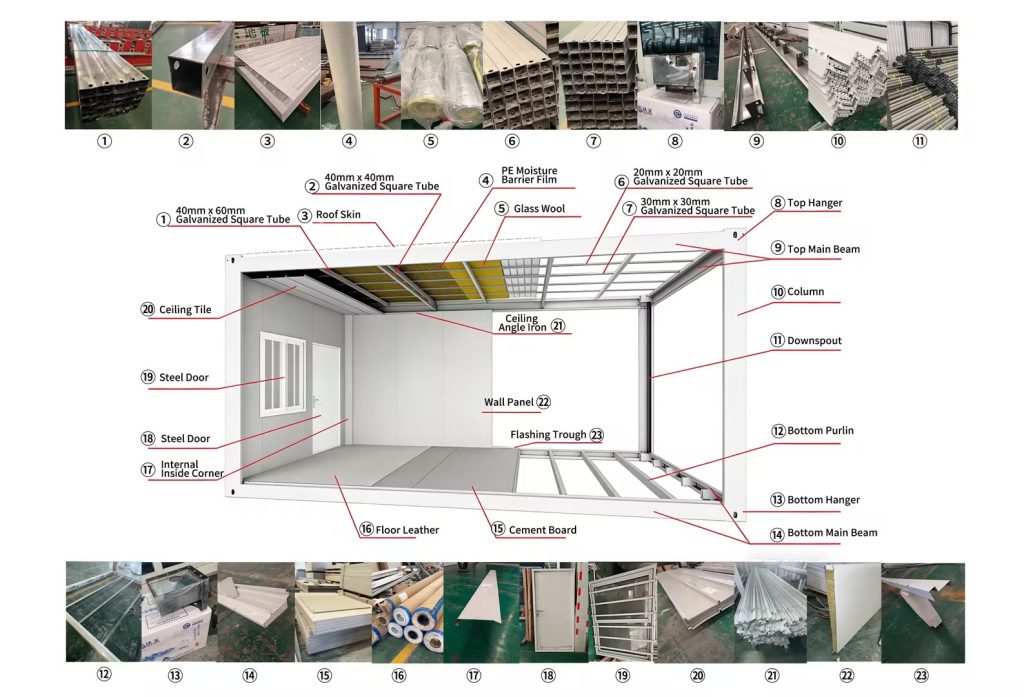
As shown in the structural diagram, the roof assembly includes:
- An external steel roof skin
- Galvanized square-tube roof members
- Glass-wool insulation
- PE moisture barrier film
- Interior ceiling panels
- Top main beams around the roof perimeter
- Top corner fittings, marked as “Top Hangers” in the diagram
- Downspouts positioned at the corner columns
The top main beams, top corner fittings and internal roof members form the upper structural frame. The wall panels are installed below the top main beams, while rainwater from the roof is directed toward the perimeter drainage area and discharged through the corner downspouts.
This means that waterproofing depends on several connected systems:
- The roof skin must prevent rainwater from entering the roof build-up.
- The roof edges must guide water into the intended drainage path.
- The top main beam and corner connections must not allow water to escape into the structure.
- The downspouts must discharge water without blockage or backflow.
- The PE moisture barrier must help control condensation inside the insulated roof.
A problem in any one of these areas can produce water stains inside the house.
Where Does Leakage Usually Begin?
The visible stain is not always located directly below the water-entry point. Rainwater can travel along the top main beam, roof members, wall panel channel or corner column before becoming visible indoors.
The main risk areas are the following.
Roof Skin Seams
The roof skin is the first barrier against rainwater.
Because the roof is formed from multiple steel sheets, the joints between those sheets are critical. Sealant should be applied inside the overlap before the sheets are mechanically seamed or folded together.
The correct sequence is:
- Prepare and clean the overlapping surfaces.
- Apply a continuous line of suitable sealant inside the joint.
- Bring the roof sheets together.
- Mechanically fold or lock the seam.
- Inspect the complete joint for open sections or damaged edges.
Applying sealant only over the outside of a finished seam is less reliable. The exposed material remains vulnerable to sunlight, standing water, temperature changes and physical damage.
When the sealant is placed inside the seam and compressed during folding, it is better protected and forms part of the joint rather than merely covering it.
Top Corner Fitting and Column Connection
The component marked “Top Hanger” in the diagram is the top corner fitting of the roof frame. During assembly, the top of the column connects beneath this component.
The underside of the top corner fitting and the contact surface at the top of the column must be clean, flat and properly finished.
Weld spatter, remaining welding wire, raised weld metal or other surface irregularities can prevent the two components from fitting tightly together. This creates a small gap at one of the most exposed parts of the house.
Rainwater entering through this connection may travel down the column or along the top beam. The resulting water stain can easily be mistaken for a leaking wall panel or window.
Applying more silicone around the outside may temporarily hide the problem, but the reliable solution is to make sure the structural contact surfaces fit correctly before assembly.
Top Main Beam and Drainage Path
The top main beam is not only a structural member. It also forms part of the roof-edge and rainwater-management system.
Water must move from the roof skin toward the intended drainage area and then into the corner downspouts. Problems may occur when:
- The roof skin does not direct water correctly
- The roof edge is deformed
- A drainage outlet is partially blocked
- The connection to the downspout is incomplete
- Sealant or construction debris obstructs the water path
- Water accumulates faster than it can be discharged
- A corner connection allows water to enter the beam or column area
The drainage path should therefore be checked as a complete route:
Roof skin → roof edge → top main beam drainage area → outlet → downspout
Inspecting only the exposed roof surface is not enough.
Upper Wall Panel Connection
The wall panels are installed beneath the top main beam. The upper edge of each panel must fit correctly into the corresponding beam or channel.
Leakage can occur when:
- The wall panel is cut too short
- The top main beam is distorted
- The frame is not square
- The panel is not fully seated
- The corner joint is incomplete
- The sealing strip is missing or discontinuous
- Water escapes from the roof-edge drainage area
This is particularly important during wind-driven rain. Water moving along the top beam can be forced into a small gap above the wall panel.
The solution is not to cover a large gap with foam or silicone. The beam, panel and corner connection must first fit correctly.
Waterproofing Cannot Depend on Sealant
Sealants are necessary in a detachable container house, but their role must be understood correctly.
They are suitable for:
- Sealing controlled roof-sheet overlaps
- Completing joints between correctly fitted components
- Sealing small perimeter gaps around doors and windows
- Protecting properly prepared penetrations
They cannot permanently correct:
- Distorted steel components
- Large structural gaps
- Uneven welded surfaces
- Poorly formed roof seams
- Incorrectly fitted wall panels
- Blocked drainage outlets
- Misaligned top corner connections
Low-cost factories sometimes use polyurethane foam, silicone or other sealants to cover inaccurate fabrication. The joint may remain dry during a short factory test but fail after transportation and installation.
A detachable container house experiences lifting, vibration, thermal expansion and contraction, ultraviolet exposure and repeated rainfall. If the components continue to move independently, a thick layer of sealant will eventually separate or crack.
The correct principle is:
Structural fit controls the joint. Sealant completes the joint.
Sealant should never be used to hide a fabrication defect.
Do Not Confuse Rain Leakage with Condensation
The structural diagram shows glass-wool insulation and a PE moisture barrier film inside the roof assembly.
These materials perform different functions:
- The roof skin is the primary barrier against external rainwater.
- The glass wool provides thermal insulation.
- The PE film helps limit indoor moisture from entering the roof build-up.
- The ceiling panel forms the visible interior surface.
The PE moisture barrier is not a second external roof. It should not be expected to collect or drain rainwater after the roof skin has leaked.
However, if the PE film is torn, discontinuous or incorrectly installed, warm and humid indoor air may enter the insulated roof space and reach a colder metal surface. Condensation can then form inside the roof assembly and wet the insulation or ceiling.
Condensation is more likely when:
- Dampness appears without rainfall
- Moisture is spread over a wider area
- The problem occurs during large indoor–outdoor temperature differences
- Indoor humidity is high
- The PE moisture barrier is damaged or incomplete
Rain leakage is more likely to appear during or shortly after rain and is usually associated with a seam, corner, drainage point or opening.
The two problems require different repairs, so the cause must be identified before applying sealant.
Doors and Windows Should Be Inspected Separately
Water around a door or window does not automatically mean the roof is leaking.
Doors and windows are separate openings in the wall-panel system. Their common leakage causes include:
- Frames installed out of square
- Large gaps between the frame and wall panel
- Poorly sealed upper corners
- Blocked window drainage holes
- Missing drip or flashing details
- Water travelling down from the top main beam
- Silicone used to cover an incorrectly sized opening
When water appears around a window, first determine whether it entered directly through the window perimeter or travelled downward from the roof or upper wall connection.
This distinction prevents unnecessary replacement of a window when the actual problem is located above it.
Manufacturing Details That Determine Waterproofing Quality
Two detachable container houses may use similar roof skins, insulation and sealants but perform very differently after delivery.
The difference is often found in manufacturing accuracy.
Important factory controls include:
- Keeping the top main beams straight after welding
- Forming continuous and tightly locked roof-skin seams
- Applying sealant inside the roof-sheet overlap
- Removing weld spatter and welding wire from contact surfaces
- Finishing the underside of the top corner fittings
- Keeping the tops of the columns flat and clean
- Checking the fit between wall panels and the top frame
- Keeping drainage outlets and downspouts unobstructed
- Maintaining the continuity of the PE moisture barrier
- Testing roof seams, corners and drainage paths before shipment
A neat line of visible silicone is not proof of good waterproofing. Many of the most important details are concealed inside the roof seam or structural connection.
Installation Can Create Leakage
The roof frame, columns and wall panels of a detachable container house are assembled on site. Installation quality therefore affects waterproofing.
The bottom frame should first be installed level and square. The columns and top frame can then be assembled without forcing the components into position.
During installation, the team should confirm that:
- The top of every column is clean
- No welding residue prevents full contact
- Each column sits correctly beneath the top corner fitting
- The top frame is square before final tightening
- Wall panels are fully seated beneath the top main beam
- Required sealing strips are installed continuously
- Downspouts and drainage outlets remain open
- Roof edges are not damaged during lifting
- No unnecessary holes are drilled through the roof skin
If the base is uneven or the frame is forced into alignment, the upper structure may twist. This can open gaps around the top corner fittings, wall panels, doors or windows.
Project Orders Should Add Independent Roof and Drainage Protection
The standard detachable container house already includes a roof drainage path and corner downspouts. Therefore, it is inaccurate to say that the standard unit has no drainage system.
However, long-term accommodation, construction camps and other project buildings have higher waterproofing requirements than short-term temporary units.
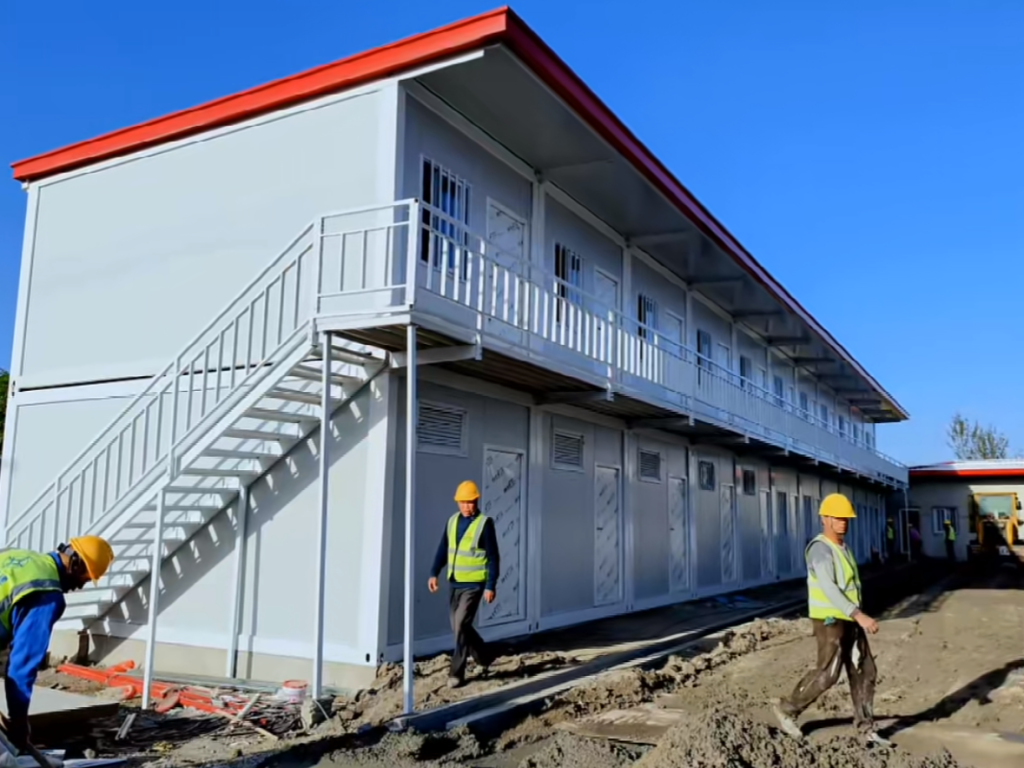
For these applications, an additional roof and independent external drainage system should be considered.
A project-specific solution may include:
- A secondary pitched roof
- External gutters
- External downpipes
- Larger eaves
- Defined discharge points
- Drainage designed for the local rainfall level
The secondary roof protects the original roof skin, roof seams and top-frame connections from direct rain and prolonged solar exposure.
External gutters and downpipes also make the drainage route easier to inspect, clean and maintain. Water can be discharged away from the wall panels, doors, windows and foundations instead of passing through the standard corner drainage route.
The secondary roof does not replace correct manufacturing. The original roof must still be properly sealed and drained. It provides an additional protective layer for projects where even a small leakage risk would be unacceptable.
How to Diagnose an Existing Leak
Do not begin by covering the entire roof with silicone or waterproof coating.
First determine whether the moisture is caused by rainwater or condensation. Then inspect the water path in separate sections.
A controlled inspection can follow this order:
- Roof-skin seams
- Roof edges and the top main beam
- Drainage outlets
- Downspouts
- Top corner fitting and column connections
- Upper wall-panel joints
- Doors and windows
During a hose test, apply water to only one area at a time. Spraying the entire roof at once makes it difficult to identify the actual entry point.
Once the source has been found:
- Allow the area to dry.
- Remove failed sealant where necessary.
- Correct any misalignment, blockage or structural gap.
- Repair the roof seam or replace the required sealing material.
- Reapply sealant to the correctly fitted joint.
- Repeat the water test before closing the ceiling or interior finish.
The repair should address the point where water enters, not only the point where it becomes visible.
| Inspection Area | What Should Be Checked | Typical Warning Sign |
|---|---|---|
| Roof Skin Seam | Confirm that sealant is applied inside the overlap before the roof sheets are mechanically seamed. | Sealant is applied only over the outside of the finished seam. |
| Top Corner Fitting | Check that the underside is clean, flat and fully seated on the top of the column. | Weld spatter, welding wire, raised weld metal or a visible gap. |
| Column Top | Make sure the contact surface is level, clean and properly finished before assembly. | An uneven bearing surface prevents the column and top corner fitting from closing tightly. |
| Top Main Beam | Check that the roof-edge drainage area is straight, continuous and free from obstruction. | Deformation, construction debris or visible water accumulation. |
| Drainage Outlet | Confirm that rainwater can enter the intended outlet freely without restriction. | Sealant, dirt or metal debris partially blocks the opening. |
| Downspout | Inspect the connection between the roof drainage outlet and the corner downspout. | Slow drainage, leakage around the connection or incomplete discharge. |
| Upper Wall Joint | Confirm that the wall panel fits tightly and continuously beneath the top main beam. | A short panel, open corner, missing sealing strip or excessive foam. |
| Moisture Barrier | Check that the PE moisture barrier film is continuous and has not been unnecessarily damaged. | Tears, open joints or missing sections that may allow condensation to develop. |
| Doors and Windows | Check that frames are square, perimeter joints are controlled and drainage holes remain open. | Large gaps, blocked drainage holes or silicone covering an incorrectly sized opening. |
| Project Roof | For long-term or high-rainfall projects, consider a secondary roof with external gutters and downpipes. | A standard temporary configuration is used without considering the project environment. |
Conclusion
Preventing leakage in a detachable container house requires more than choosing a better sealant.
The roof skin must be joined correctly. The top main beams must guide water toward the drainage outlets. The downspouts must remain clear. The top corner fittings and columns must fit tightly, and the wall panels must be installed correctly beneath the upper frame.
The PE moisture barrier must also remain continuous so that condensation is not mistaken for a leaking roof.
For temporary use under normal conditions, a well-manufactured standard roof and drainage system may be sufficient. For long-term camps, accommodation buildings and projects in high-rainfall areas, a secondary roof with independent external gutters and downpipes provides a more conservative solution.
When comparing suppliers, buyers should not ask only:
What sealant do you use?
A more useful question is:
How are the roof seams, top corner connections and complete drainage path manufactured and tested?
That answer provides a much clearer indication of the building’s real waterproofing quality.
FAQs
Where do detachable container house roofs most commonly leak?
The most common areas are roof-skin seams, roof edges, top corner fitting connections, drainage outlets and the joints between the top main beam and wall panels.
Why is the connection between the top corner fitting and column important?
The column is assembled beneath the top corner fitting. Weld spatter or an uneven contact surface can prevent the connection from closing tightly, allowing rainwater to enter the corner structure.
Does a detachable container house already have downspouts?
Yes. The standard structure shown in the diagram includes corner downspouts. Project buildings may still benefit from a secondary roof with separate external gutters and downpipes.
Can water on the ceiling be caused by condensation?
Yes. If the PE moisture barrier is damaged or incomplete, humid indoor air can enter the insulated roof assembly and condense on colder metal surfaces. This can resemble a roof leak.
Can silicone permanently repair a roof leak?
Only when the original joint is structurally correct and stable. Silicone cannot permanently repair a distorted beam, open roof seam, uneven corner connection or blocked drainage system.
Is a secondary roof necessary for every detachable container house?
No. It is mainly recommended for long-term buildings, construction camps, high-rainfall locations and projects where additional waterproofing protection and easier drainage maintenance are required.